It is World Cyanotype Day on 30th September (always the last Saturday in September) .

I was lucky enough to have my article on Cyanotype for beginners on the Alt photography website:
https://www.alternativephotography.com/
Happy to receive comments,

29 Friday Sep 2023
Posted in Photography
It is World Cyanotype Day on 30th September (always the last Saturday in September) .
I was lucky enough to have my article on Cyanotype for beginners on the Alt photography website:
https://www.alternativephotography.com/
Happy to receive comments,
05 Wednesday Aug 2015
Posted in blues music, cyanotypes
Tags
alternative photography, blueprints, blues, blues music, cyanotypes, Herschel, indentured labour, slavery, sun prints

Viewing the Blues was exhibited in London on 24th-27th September 2015.
What was the origin of the exhibition?
My love of Blues music was the starting point (notice the blog posts on this site).
*
Secondly – the origins of the Blues, starting in West Africa, through slavery and then emancipation.
*
Thirdly – the cross-over, after emancipation , to new opportunities for ex-slaves, to develop and enjoy their music in the US (see Juke joints etc).
*
Fourthly – the interaction between ex-slaves and new indentured labourers in places such as Mauritius and the Caribbean (mainly coming from the Indian sub-continent).
*
Fifthly – my interest in photography, particularly image making, using the cyanotype and anthotype processes.
*
Sixthly – Sita Harris, my talented wife, invited me to join her in the same space as her exhibition of watercolours, in London, called ‘My Living World’
*
The content of my exhibition had a focus on three dimensions (illustrated using my Cyanotypes):
i. Slavery and emancipation


The slave trade was driven by a huge demand for agricultural labour. Whether it was the USA, the Caribbean or the Indian Ocean islands, plantations of sugar, tobacco and cotton enslaved thousands of mainly African peoples to a life of hardship and sometimes beatings and particularly harsh punishment.

Cyanotype on paper

Cyanotype on cloth
*
ii. Blues and blues musicians
Blues music has its roots in Africa, in the sounds that travelled on the slave ships and that evolved during the black people’s struggle in the Americas.
Beginning in the seventeenth century and extending into the nineteenth century after emancipation, the unaccompanied vocal music and call and response singing that slaves brought from West Africa meshed with a variety of other elements – including European church music, popular minstrel songs, ragtime music to create this new sound that came to be known as the ‘blues’.


toned print

Maybe our forefathers couldn’t keep their language together when they were taken away, but this-the blues –was a language we invented to let people know that we had something to say. And we have been saying it pretty strongly ever since.
quote by BB KING (Blues Guitarist) at Lagos University , Nigeria 1973.


*
iii.Indentured labour, mainly in the Indian diaspora


*
It was slavery that brought West African people to the Americas, brought their music , language and song.
It was slavery that forced these West Africans to keep some semblage of their culture by using it in their field hollers and ‘call and response’ singing.
It was emancipation that allowed these same people to join together in Juke joints to enjoy playing and singing music that had roots in a number of West African countries.
It was emancipation that brought indentured labourers to work on sugar and cotton plantations.
*
The exhibition starts to weave these connections together.
There were two hour workshops on the cyanotype process.
Participants learned about cyanotypes by making their own. Frames were provide so some could frame their own work of art, on site, to take home.
*
Notes on the Cyanotype process
Cyanotypes were discovered by Sir John Herschel in 1842 and are created using a solution of iron compounds to produce a cyan blue print. A variety of effects can be achieved by varying the substrate (watercolour, cartridge, cotton cloth) the amount of sensitiser , time under UV and toning.
Initially the process was mainly used for reproducing diagrams (coining the term “blueprint”) . One of the first people to use cyanotypes for photographic printing was Anna Atkins who produced the first photographic book of cyanotype prints in 1843.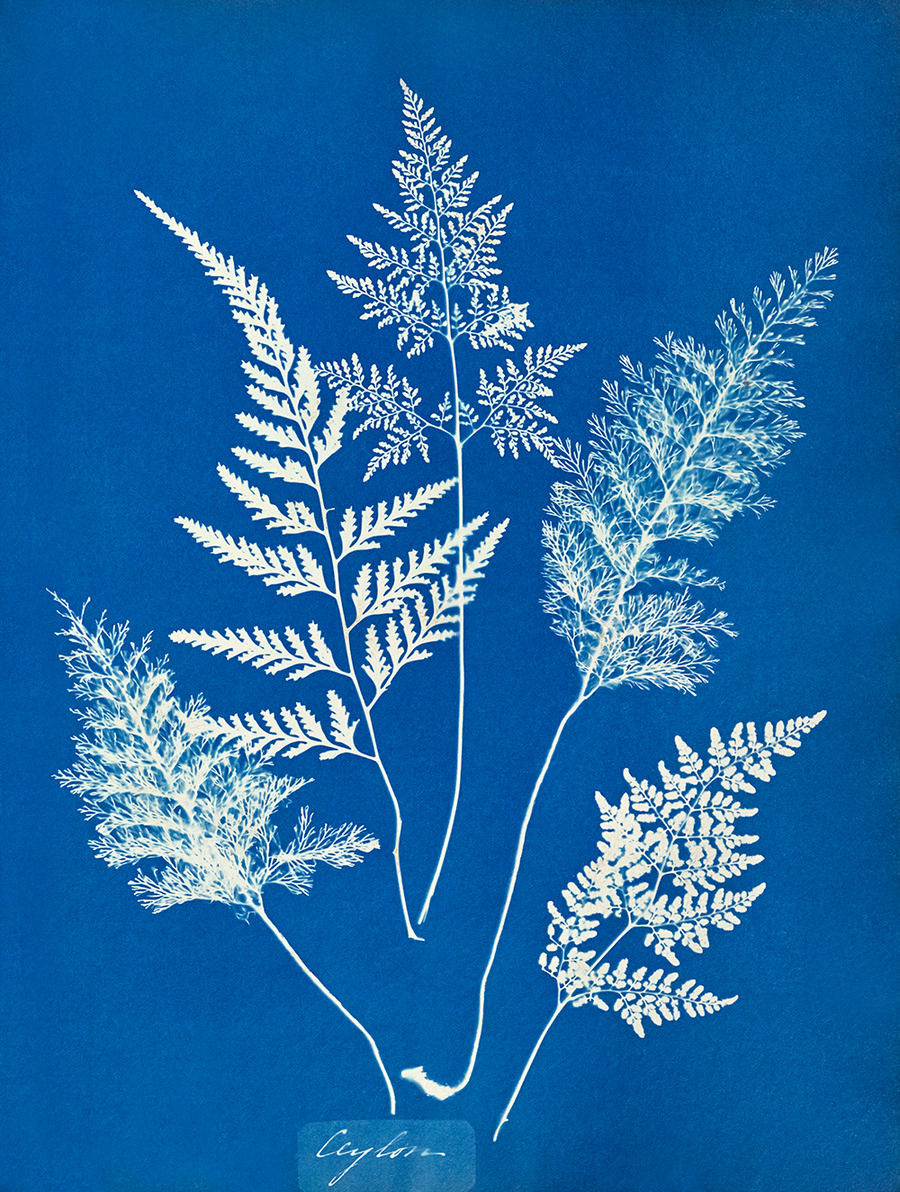
Anna Atkins is considered to have been the first female photographer. She was born in Kent in 1799, and she made her most significant contribution across 10 years in the mid-19th century in which she created at least 10,000 images by hand. But it was what she did with those pictures that gave her a place in art history. Atkins realised what millions of social media users know today: that images are for sharing. She created the first book to contain photographs, and she paved the way for photography’s power to connect people. Joanna Moorhead -The Guardian ( 23 Jun 2017)
Paper, card, cloth, glass or any other naturally absorbent material is coated with the Potassium ferricyanide and Ferric ammonium citrate and dried in the dark. Objects or negatives are placed on the material and exposed under UV light and processed by rinsing in water to remove the unreacted iron solution.
Cyanotypes and ‘Alternative’ photographic processes.
Alternative processes have a lot to offer in terms of creative freedom, experimentation and beauty. The subtleties offered in tonal variation within blues and after toning, browns and even pinks and yellows make each print unique.
I have made them the foundation of my image making as a photographer and teacher.
As well as cyanotypes I have experimented with Anthotypes (using plant and fruit extracts as sensitisers) and the use of recycled materials.
The final image, its beauty and its mystery, can be the objective but personally I also find the practical process, involving experimentation, particularly satisfying.
Some background to the Cyanotype process:
https://youtu.be/3s0hiBi5c4Y?feature=shared
You may have missed the exhibition at the Barbican in London – but get inspired by watching this:
23 Monday Apr 2012
Posted in alternative photography
Having had some success with blue pictures or cyanotypes (see previous posts) on my own and with young children while teaching , the joy of ‘alternative’ photography can certainly be extended by building a pin hole camera. A good change form the predictability of digital….read on…
Worldwide Pinhole Photography Day 2012

What is the Worldwide Pinhole Photography day?
This is an international event created to promote and celebrate the art of pinhole photography.
On this unique day, we encourage people throughout the world to take some time off from the increasingly technological world we live in and to participate in the simple act of making a pinhole photograph. to share their visions and help spread the unusual beauty of this historical photographic process.
And from the World Pinhole Photography Day website
Why Pinhole Photography?
A unique personal experience!
Pinhole photography allows you to make a photograph that requires only a light-tight container (box, can,…) with a tiny hole in one side (as a camera) and any photo-sensitive surface in it. You can adapt an existing camera, or make the camera yourself . The experience of image-making becomes a little more special when created with your own hand-made camera; so, we provide different instructions in making your camera on the Support page.
With your own camera, infinite depth-of-field, skewed perspectives, and slower exposures, you may ultimately become more creative and more selective about what you choose to photograph. Magical things happen in pinhole photography…
How To Make a Pinhole Camera
Making A Pinhole Camera From An Oatmeal Box (Stewart Lewis Woodruff)
Excellent instructions on how to make a pinhole camera out of a paper oatmeal box. Good eating, good photos!
How to Make an Oatmeal Tin Camera (Zernike Au and Yin Yin)
This project is rather simple. You can do it with your family, your kids, your students or your friends. We have supplied photos as a visual guide, rather than lengthy descriptions.
Populist Camera Instructions ((Nick Dvoracek))
A 35mm camera that anyone can make. (pdf, 4.5MB, 12 pages, 8.5 x 11 inches).
Illustrated How to Make a Pinhole Camera (Chuck Flagg)
Detailed illustrations on how to make a simple pinhole camera.
How to Make a Pinhole Camera (Wolfgang Thoma)
Anything about Alternative Photography can be found on this website

And to whet your appetite -here is an example of one of the articles on pin hole photography that you will find on the website:
Adventures with multi-pinhole cameras
Writer and photography / Malin Fabbri
Malin Fabbri builds and tests multi-pinhole cameras. An excerpt from Diffusion magazine, volume II.

malin fabbri
Image right: Sergel by Malin Fabbri
I have always been drawn to alternative photographic processes for many reasons. Among those reasons exists the potential for what I call “happy accidents”: events and outcomes that occur without intention and that ultimately result in a better print.
Typical happy accidents are often related to the print-making process: an unintentional spill of emulsion on paper, a brushstroke taking on a shape of its own or a color shining with an unexpected hue. Such accidents, commonplace in the pinhole photography, can lead to a very pleasing print (and, in my case, a very happy photographer).
These “accidents” may also occur in-camera, however: intriguing light leaks, a failure to fully wind between exposures, or an imperfect container all can result in surprisingly beautiful images. When it comes to building a pinhole camera, though, why leave these events to chance? If one can create his or her own luck, shouldn’t it also be possible to lure the happy accident into forming?
Unique Characteristics of Pinhole Photographs
Many special effects can be created by modifying a pinhole camera. As an example, the camera can be designed with a bent film plane, which distorts horizons and subject matter. Additional effects can be obtained by modifying the focal length: a camera with an extremely short focal length creates a wide angle effect, whereas a telephoto effect may be created by building a camera with a long focal length. Another alteration involves zone plates, which are a series of clear and opaque rings that add soft focus and sometimes a halo to the subject. Furthermore, a “cubistic” effect (multiple exposures) can be achieved by building a “chest of drawers” style camera. This effect involves several pinholes exposing light on the paper or film.
When it comes to uniqueness and special effects, my favorite pinhole camera technique involves using multiple pinholes. The first multiple pinhole I ever set eyes on was taken by Jan Kapoor with her 360-degree camera. With such a camera, subjects and landscapes merged in Jan’s images, touching and interacting with each other. Jan’s pinhole camera was created using a hexagonal box. It has six separate pinholes of the same diameter on each side of the box. Inside the camera, the film is wrapped around a cylinder, making it possible for Jan to expose the film from several angles. She is able to use those six pinholes individually, simultaneously, instantly or over a period of time to create her wonderful landscapes.
Constructing Multiple Pinhole Cameras
Now that we’ve covered some basics, let’s delve a bit deeper into my favorite pinhole camera technique. In the experiment I will describe, I had a particular goal in mind: I wanted to see what kind of results I could get by creating and comparing two multiple pinhole cameras of similar size but of different shape: one square, the other round.
The first step? Choosing my containers. I admit that I am one of those computer nerds who buys software and then keeps the boxes, full of manuals and CDs, on the bookshelf. When I was looking for a container for my most recent camera a big, sturdy, completely black (and therefore already prepped as a pinhole camera) “Apple” box caught my eye. I was forced to sacrifice a few manuals into the recycling bin, but I decided this box would be perfect for making a square multi-pinhole camera. The second container was even easier to choose, as it involved washing down a tin of very tasty “Anna’s Gingerbread Biscuits” with a few cups of tea to free up a perfectly round container.
I then spent a day with Lena Källberg, in her studio in Stockholm, to build and test my two cameras (ingeniously named “iPinhole” and “Ginger”). Lena, who is also an avid pinholer, built her own multi-pinhole camera using a round cake tin. She named it “Turizt” after the name on the box. You can call me crazy, but I have a theory that computers and cameras work best when they have a good name. If you don’t already have names for your cameras, give it a try…you might be surprised by the results.
After contemplating the technical details, I decided to give the iPinhole camera three openings (the openings would eventually hold a piece of aluminum, through which the pinholes would be drilled): a square opening in the front – piercing the Apple logo – and one in each side. Ginger received three openings as well, each spaced evenly across the front of the tin. Lena decided to make hers a 360-degree camera, which meant the Turizt camera was the beneficiary of three openings, carefully measured and spaced exactly equidistant around the box – she is a perfectionist!
Each of our cameras received an inner circular can for fastening the paper. For the iPinhole and Ginger, the inner can was placed in the center. The inside of Ginger was then sprayed with matte black paint. Turizt was given a coat of matte cardboard paper while iPinhole, already black both inside and out, needed no extra coloring.
After prepping the cans and the box, it was time to work out optimum pinhole sizes. We elected to use “PinholeDesigner”, which is a great calculator that can be downloaded and installed from this site: www.pinhole.cz/en/pinholedesigner. Our calculations revealed that the optimum pinhole size for both iPinhole and Ginger was between 0.31 mm and 0.40 mm. Turizt had an optimum pinhole size of 0.36 for all six holes. Making nice, round pinholes of the right size is one of the trickiest challenges in constructing a pinhole camera. We selected to use an old beer can, which was cut, sandpapered smooth, pierced with a needle, scanned in and measured in Photoshop, pierced, sandpapered again, scanned and measured again, and again, and again.
One might ask at this point: why drive ourselves crazy trying to make the perfect hole? For this reason: a perfectly calibrated pinhole camera has an infinite depth of field, which means that everything in the final photograph will be in focus. That quality is what we were after, and we managed to make all the holes with a difference of less than 0.02 mm.

After we had determined the size of the pinholes and the focal length, we could easily work out the f-stop of our cameras using this formula: focal length/diameter of pinhole=f-stop
Testing the New Cameras
All three cameras were quite close in their f-stops. The iPinhole camera had f-stops ranging from f/179 to f/211. Ginger’s range landed between f/160 and f/184, and Turizt had an f-stop of f/180.
When the paint had dried and we were finally happy with the pinholes, it was time to test for light leaks. We journeyed into the darkroom and inserted a brand new sheet of unexposed paper into each camera and placed the cameras in the sun for a few minutes, WITHOUT opening the shutters. The paper was then developed and each sheet emerged white as snow – perfect, no light leaks!
We could finally head out to the park to field test our cameras. It was late in the afternoon, but it had been a lovely day and it was still sunny. The September sun was setting behind a number of buildings. After consulting the exposure chart listed in From pinhole to print (also shown here) I decided on an exposure of “cloudy at f/180”. This translated to an exposure time of two to four minutes, so I selected to expose the paper for an average of three minutes.
Ginger behaved excellently during the exposure, and the black tape shutters worked fine. Turizt also performed well. iPinhole, however, was a different matter. The use of a black tape shutter on a cardboard box was not optimal, as part of the box’s paper tore loose when I pulled the tape away for exposure. This not only ripped pieces off the box but also rendered the black tape useless for further exposures. As I had not taken this into consideration, I had no more black tape with me in the field and had to cover the holes with my hand on the way back to the darkroom. Not ideal.

malin fabbri
Image right: Sushi bar by Malin Fabbri
It was now late, however, and the sun had set. It was time to call it a day – no more time for test shooting. We returned to the dark room to develop our prints. iPinhole’s test print did develop a black patch on the side of the paper – I suspect due to an inability to close the shutter properly. That very night, I used a beer can to create a reinforced plate over the holes in iPinhole, so I would be able to remove the black tape without parts of the box falling off. Much better!
The cameras were now complete, and the test prints developed. Complete, at least, in the cases of iPinhole and Ginger. Lena achieved a very nice test shot with her Turizt but, because she is a perfectionist, has decided to fine-tune her camera. She is working out the optimum space between the inner can and the outer can to make a perfectly seamless gap between each image. So far, her conclusion is that five pinholes, coupled with the use of a smaller outer can, will result in a perfect multi-pinhole camera.
Although we have improved our chances of avoiding accidents, we are still treated with unpredictability of pinhole photography and those aforementioned happy accidents. To the seasoned photographer, pinhole cameras may seem too simple to offer much versatility in the area of image-making. However, these “limitations” often help a photographer free him or herself from the discrete and often rigid technical settings that more modern cameras possess. Such pinhole cameras, utilizing one or more tiny, drilled holes, record the world differently than the way our eyes see it and add unexpected characteristics to reality. In this way, what were once limitations may then become the opposite: they may become, in fact, opportunities, inspiring creative problem-solving in less than perfect situations.
An explanation of how the multi-pinhole camera reverses the image
When light enters a pinhole camera, the image is reversed and upside down. A multipinhole camera will not make panoramic images, as perhaps would be expected, since each image is reversed. An object that sits at a dividing line between two pinhole projections will be split into two pieces that are on the far sides of the negative. To achieve panoramic images you would in fact need a very complex design using mirrors. What you achieve instead with a multipinhole camera is an interesting blend of the landscape and and unexpected merging of objects. The images reverse into each other, one after another.
This article was published in Diffusion magazine. Malin Fabbri moved from Sweden to London to study, and earned an MA in Design at Central St. Martin’s. She has worked professionally with big media names in London, and has written two books on alternative photographic processes. In 1999 she began AlternativePhotography.com, and continues to be it’s editor.
need some more inspiration:
and even more (and smaller)
And for all alternative photographic processes: https://www.alternativephotography.com/
24 Thursday Mar 2011
Posted in alternative photography, history, Photography
Tags
alternative photography, anthotypes, exposure, flowers, plants, Sir William Herschel, victorian, victorian photography
Like Cyanotypes, Anthotypes (based on flower and other plant material ) were made real by Herschel.

Processes are described in alternative photography -a real gem of a site if you want to explore a wide range of photographic processes, even in this digital age (probably now even more necessary).
As a teacher, I found cyanotypes and anthotypes particularly helpful as they don’t involve harmful chemicals, so are quite safe for children to use (the teacher may have to prepare the ‘blue’ cyanotype paper though). The rest just utilises the sun and water.
Anthotypes are a beautiful way to create fine art images right from your garden. This long neglected process, originally invented by Sir William Herschel in 1842, is simple yet elegant. An emulsion is made from crushed flower petals or any other light-sensitive plant, fruit or vegetable. A coated sheet of paper is then dried, exposed to direct full sun-light until the image is bleached out. This is done ideally in a printing frame over 1-3 days or more depending on conditions and negative/material. What you see is what you get. No fixation is required. You can follow the gradually emerging image as you go. Results vary greatly from plant to plant and the strength of the emulsion employed. The resulting images are quite timeless,but certainly reminds you of the beauty of subtlety in tone.
The Anthotype process is a great way to make images, as long as you are patient, and is certainly the most environmentally-friendly.
The photo-sensitive properties of plants and vegetables have been known to scholars for centuries. Among many early observations the experiments of Henri August Vogel in Paris are of particular interest. He found in 1816:
An alcoholic tincture of either red carnations, violets or corn poppy turned white behind blue glass in a few days, while it remained unchanged behind red glass after about the same time. Cotton and paper coloured with these tinctures showed the same differences.
When Herschel later that century attempted to invent a colour process he tried several flower and plant emulsions and published his findings. His research resulted in what we now refer to as the Anthotype process. It should be pointed out that his research into making photographic images from flowers was limited and was ultimately abandoned since no commercial application was feasible from a process which takes days to produce an image. The process continued to be listed in photographic the literature of the time but was likely little used.
I could not phrase it better than Snelling’s description which follows:
“From an examination of the researches of Sir John Herschel on the coloring matter of plants, it will be seen that the action of the sun’s rays is to destroy the colour, effecting a sort of chromatic analysis, in which two distinct elements of color are separated, by destroying the one and leaving the other outstanding. The action is confined within the visible spectrum, and thus a broad distinction is exhibited between the action of the sun’s rays on vegetable juices and on argentine compounds, the latter being most sensibly affected by the invisible rays beyond the violet.
It may also be observed, that the rays effective in destroying a given tint, are in a great many cases, those whose union produces a color complementary to the tint destroyed, or, at least, one belonging to that class of colors to which such complementary tint may be preferred. For instance, yellows tending towards orange are destroyed with more energy by the blue rays; blues by the red, orange and yellow rays; purples and pinks by yellow and green rays.”
– Henry H. Snelling
1. Start with any flower you like although the following seem to work well: Poppies (images below were made with the red poppies above) or Peonies (Clive Heritage-Tilley). According to Henry S. Snelling the leaves of the laurel, common cabbage, and the grasses, are found sufficiently sensitive. I have also tried Goldenseal and Echinacea but results were not encouraging.
The most important thing to remember is that many, many species of flowers have never been explored. Crush the petals in a pestle and mortar to a fine pulp and add a little distilled water as you go. The purest water you can find is recommended since any impurities will interfere with the delicate light sensitive properties of the emulsion. Filter the juices through a cheese cloth or clean linen to remove small plant bits and some impurities.
2.Using a clean simple brush coat any paper you like (hand-made Paper being an extra nice touch) in nice even strokes vertically and horizontally leaving no pools of emulsion on the surface.
3.Dry the paper in the dark over-night or with a hand dryer on low heat.
4. Contact print any media or plant in a printing frame or clip frame. Expose in full sunlight over 1-3 days or more depending on your aesthetic. Done. The print can be kept in subdued or artificial light although exposure to direct sunlight is discouraged.
A method of fixing Anthotypes is not known and perhaps not necessary despite obvious limitations. However, some have used Borax,to darken the image and possibly give some extra life.
Denatured alcohol or even lighter fluid can be used instead of Distilled and/or de-mineralized water.
Keep the emulsion fairly thick (i.e. less water/alcohol) for darker images or add more distilled water for a lighter image. In the case of red poppies a thicker emulsion yields a light brown image while a thinner emulsion looks more light purple. You can blend your emulsion to get the thickness your prefer as you go along.
Store your emulsion in a dark bottle away from sunlight. It should keep for some time but re-filtration through a sieve is a good idea before coating if the emulsion has not been used. I have used stored older emulsions for months after and it was fine.
The emulsion on paper which is fully exposed to sunlight will slowly fade to near white or faint yellow as its colour is destroyed by the suns rays.
Since exposures must take place in full sunlight the movement of the sun will naturally create a slight shadowing effect unless the whatever media is in very tight contact with the glass.
Will a light-box work? I suppose if the light source is full spectrum and sufficiently bright, then maybe. However, a popular maxim for alternative photography states; “There’s no substitute for the sun”. This I believe certainly applies here.
Larger negatives/stencils/acetates seem better suited for this process. I found smaller negs not to yield enough detail.
Note a ‘negative’ can be made by paper -just print a strongly contrasting picture -you can use this or produce the negative using photoshop etc.
Other things to try out:
Other flower suggestions:
Henry H. Snelling writes, based on his research:“Viola Odorata – or sweet scented violet, yields to alcohol a rich blue color, which it imparts in high perfection to paper. Senecio Splendens – or double purple groundsel, yields a beautiful color to paper”.

 Check out Nicky Thompson’s site
Nicky has managed to match the image with the colour of the sensitizer (onion,blackberry etc)


Sensitizers
Those interested will want to experiment -but as starting points -the following have been successful:
lily of the valley (‘short’ exposure time)blueberries, blueberries, coffee grinds, red chilis, beetroot and spinach.I have peeled beetroot for eating and used the peel (after soaking) for my emulsions.
